


Introduction
When a .NET application runs as a single instance, distributed locks are usually not necessary. One running instance is responsible for deciding when a background job, scheduled task, or other operation should begin.
Distributed locks become relevant when that same application runs in multiple concurrent instances and more than one instance can attempt to perform the same operation at the same time. One example is when the same service runs on multiple servers or as multiple application instances. If two instances see the same pending job before either marks it as in progress, both may try to process it. This is the sort of race condition distributed locks help prevent.
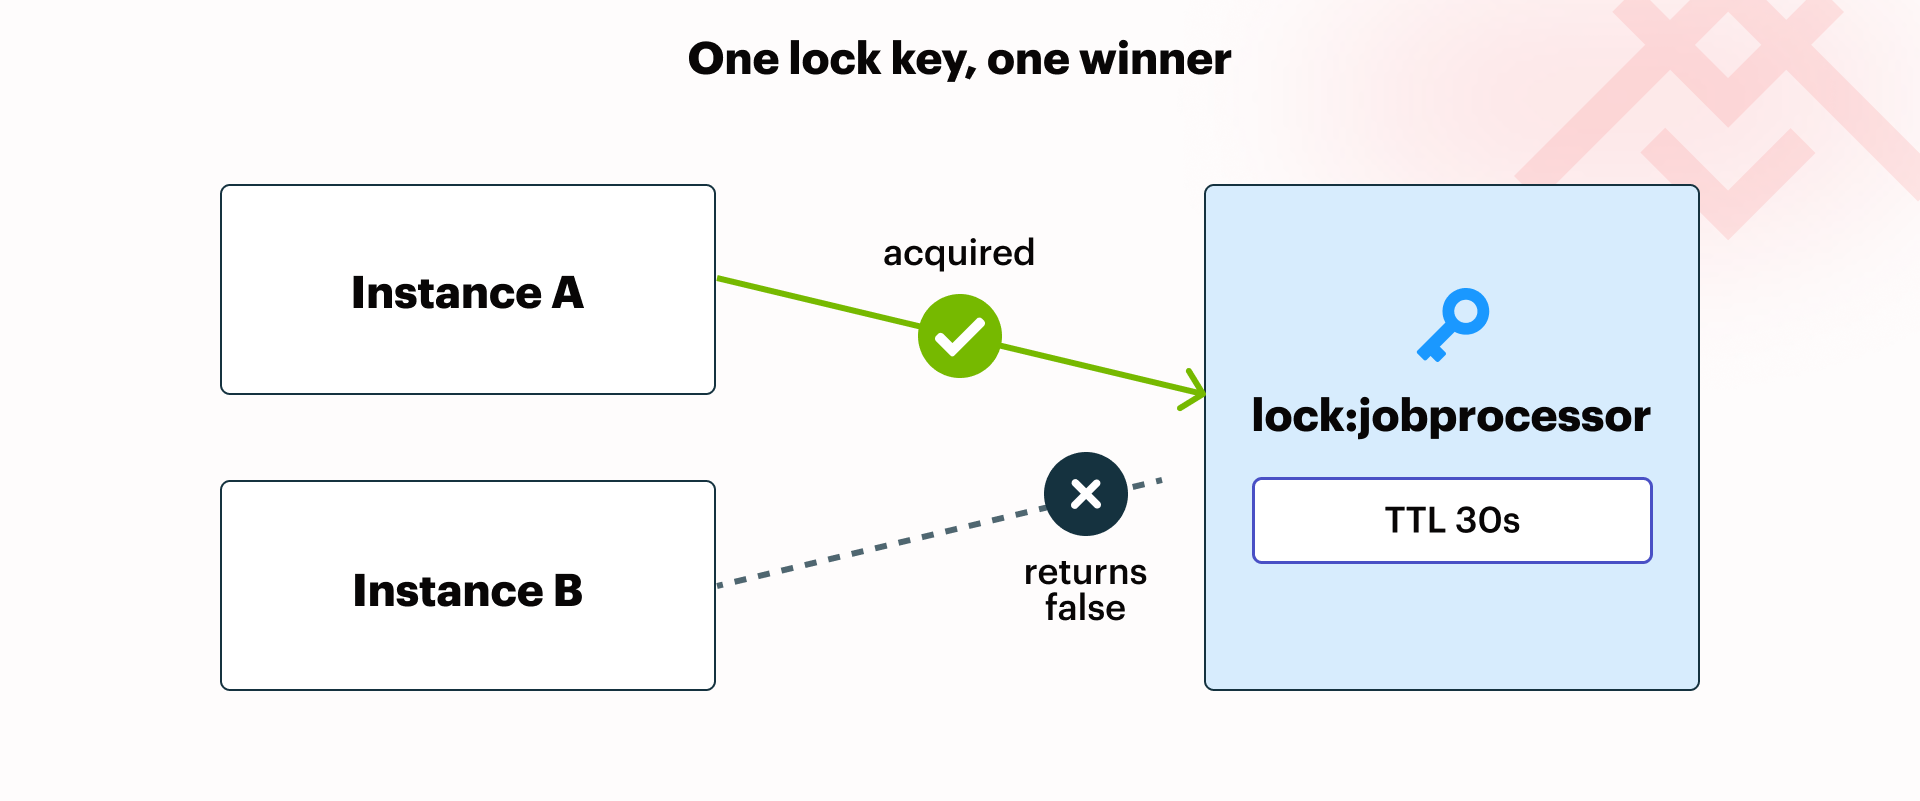
A distributed lock gives those instances a shared way to decide which one temporarily owns the operation. For .NET applications running on Windows, Redis® can provide that shared coordination layer outside any one application instance, and Memurai provides a Redis-compatible server that runs natively as a Windows Service.
This article shows how to implement distributed locking in .NET using Redis on Windows with StackExchange.Redis and Memurai. We will cover lock acquisition, safe release, time-to-live strategy, retry logic, and the practical limits developers should understand before using locks in production.
How Redis Locks Work
A Redis lock is usually represented by a value stored at a specific Redis key once the lock is acquired. Every application instance that wants to coordinate the same operation must use the same lock key. For tutorial purposes, lock:jobprocessor is the shared Redis key used throughout this article. The lock prefix identifies the key’s purpose, while jobprocessor identifies the operation that only one application instance should run at a time.
If the key does not exist, an application instance can create it and become the lock holder. If the key already exists, another instance is already holding the lock.
A core requirement is that lock acquisition must be atomic: the application must create the lock only if it does not already exist, and the expiration must be assigned as part of the same Redis operation.
Redis supports that atomic pattern with SET NX EX or SET NX PX, which sets the key only if it does not already exist, and assigns an expiration (seconds for EX and milliseconds for PX) at the same time. The NX option prevents the command from overwriting an existing lock. The expiration option (EX or PX) prevents the lock from being held forever if it fails to be released.
StackExchange.Redis exposes this pattern through LockTakeAsync, the async version of the Redis lock-take operation. Instead of writing the Redis command directly, .NET code calls LockTakeAsync(key, token, expiry). The key identifies the operation or resource being protected. The token is a unique value for the current lock holder. The expiry is the lock TTL.
The lock key identifies the operation being protected. The token identifies the application instance that acquired the lock. Atomic acquisition prevents two instances from acquiring the same lock key at the same time, but it does not prevent an old lock holder from trying to release the lock after its TTL has expired.
If the value at lock:jobprocessor expires and another instance later acquires lock:jobprocessor with a new token, the original token should no longer be able to release it. LockReleaseAsync(key, token) performs that token check so one instance does not release a lock now owned by another instance.
Implementing a Distributed Lock
Acquiring the Lock
To get started with Redis locks, let’s create a new console application in Visual Studio. Additionally, make sure to add the StackExchange.Redis package to the project.
dotnet new console -n RedisLockingDemo
cd RedisLockingDemo
dotnet add package StackExchange.Redis
The following example connects to Memurai on the local Windows machine and tries to acquire a lock for a job processor operation. The lock expires 30 seconds after being acquired:
using StackExchange.Redis;

await using var redis = await ConnectionMultiplexer.ConnectAsync("127.0.0.1:6379");

IDatabase db = redis.GetDatabase();

RedisKey lockKey = "lock:jobprocessor";

RedisValue lockToken = Guid.NewGuid().ToString("N");

TimeSpan lockExpiry = TimeSpan.FromSeconds(30);

bool acquired = await db.LockTakeAsync(lockKey, lockToken, lockExpiry);

if (!acquired)
{
    Console.WriteLine("Another instance may already be processing this job.");
    return;
}

Console.WriteLine("Lock acquired.");
In this example, lock:jobprocessor is the shared lock key. Every application instance that wants to protect the same operation must use the same key. The token is generated separately by each instance, so each lock holder has a unique value.
The LockTakeAsync call returns true only when the lock was acquired. If another instance already holds the lock, it returns false to indicate that failure, and the current instance should skip the protected work or retry later. Other failure scenarios typically result in thrown exceptions, e.g. if the Memurai service can’t be reached.
Releasing the Lock Safely
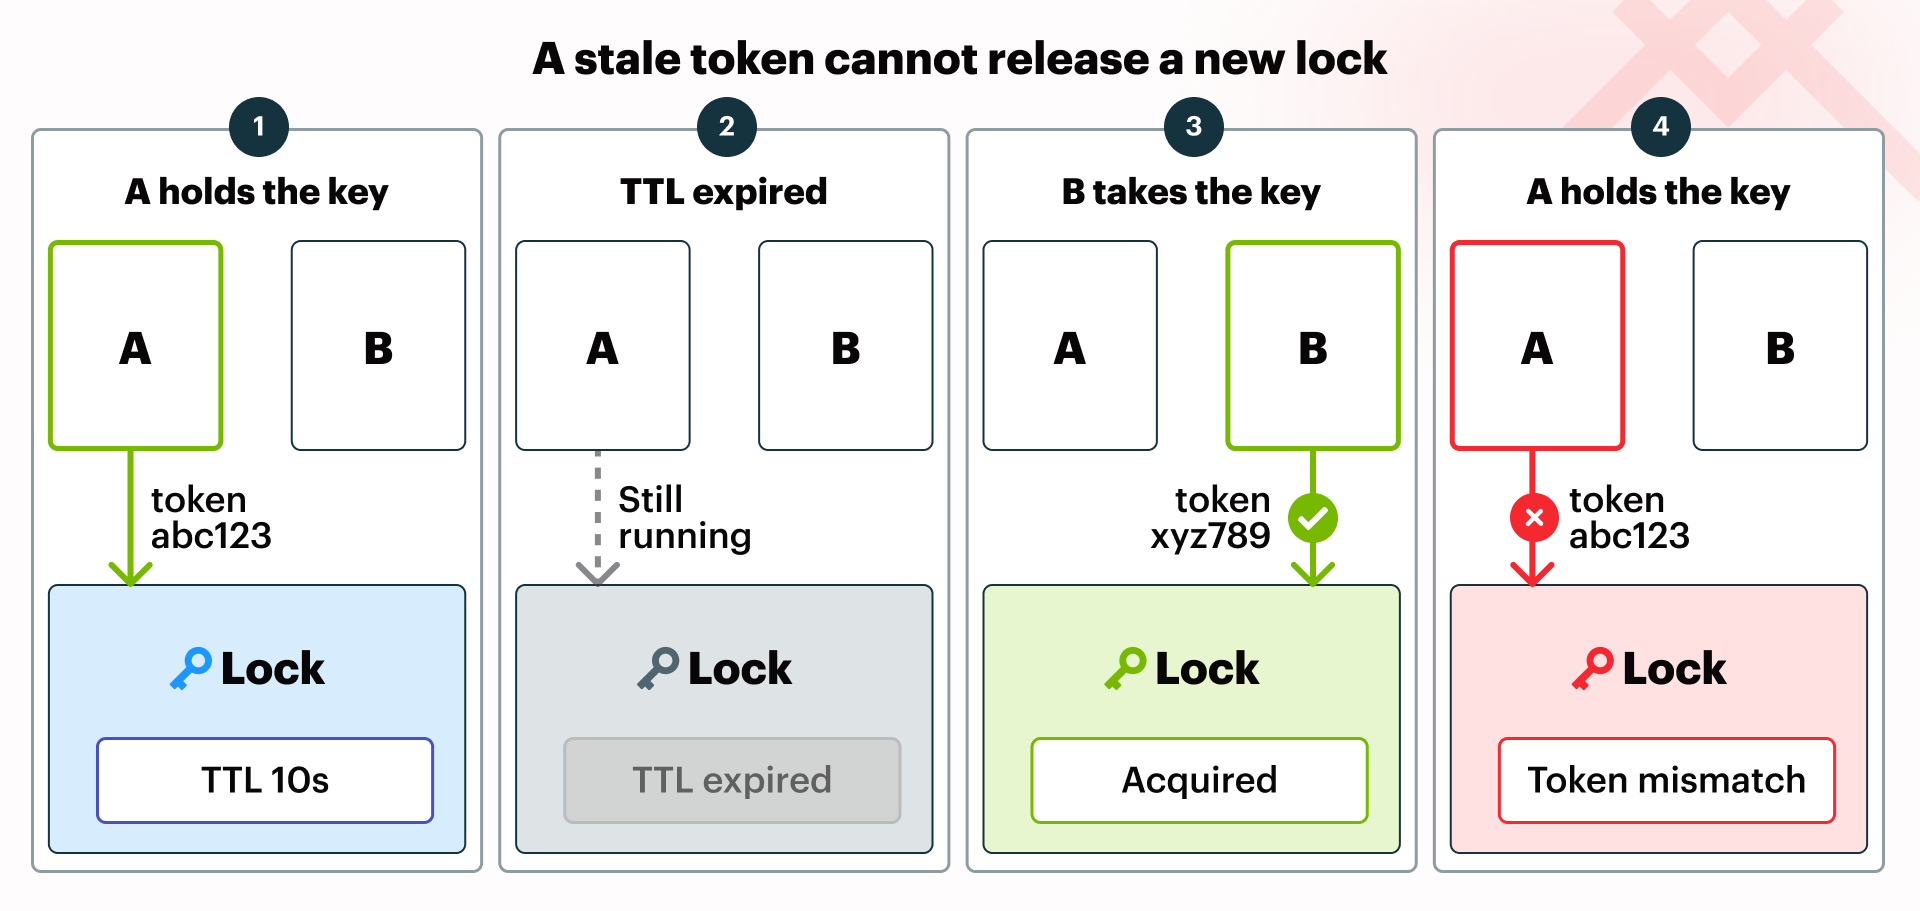
A lock should be released when the protected operation completes. In .NET, the usual pattern is to put the protected work inside a try block and release the lock in the finally block. That way, the release attempt still runs if the critical section throws an exception.
The remaining examples reuse the same ConnectionMultiplexer, IDatabase, lockKey, lockToken, and lockExpiry setup from the first snippet.
bool acquired = await db.LockTakeAsync(lockKey, lockToken, lockExpiry);

if (!acquired)
{
    Console.WriteLine("Another instance may already be processing this job.");
    return;
}

try
{
    Console.WriteLine("Processing job...");
    await ProcessJobAsync();
    Console.WriteLine("Job processed.");
}
finally
{
    bool released = await db.LockReleaseAsync(lockKey, lockToken);

    Console.WriteLine(released
        ? "Lock released."
        : "Lock was not released because the token did not match.");
}

static async Task ProcessJobAsync()
{
    // Do some work here
    await Task.Delay(TimeSpan.FromSeconds(5));
}
The call to LockReleaseAsync uses both the key and the token. If the token stored in Redis does not match the token supplied by the LockReleaseAsync call, the release fails. That behavior is important because it avoids attempting to release a lock that is not eligible to be released.
One such example is when the lock has already expired and been acquired by another instance. Another scenario is where the lock wasn't acquired successfully in the first place.
Lock Expiry and Retry Logic
A lock TTL should be long enough to cover the worst-case duration of the protected operation, plus a safety margin. If a job normally takes five seconds but sometimes takes twenty, a ten-second TTL is too short. The lock could expire while one instance is still running, allowing another instance to acquire the same lock and start overlapping work.
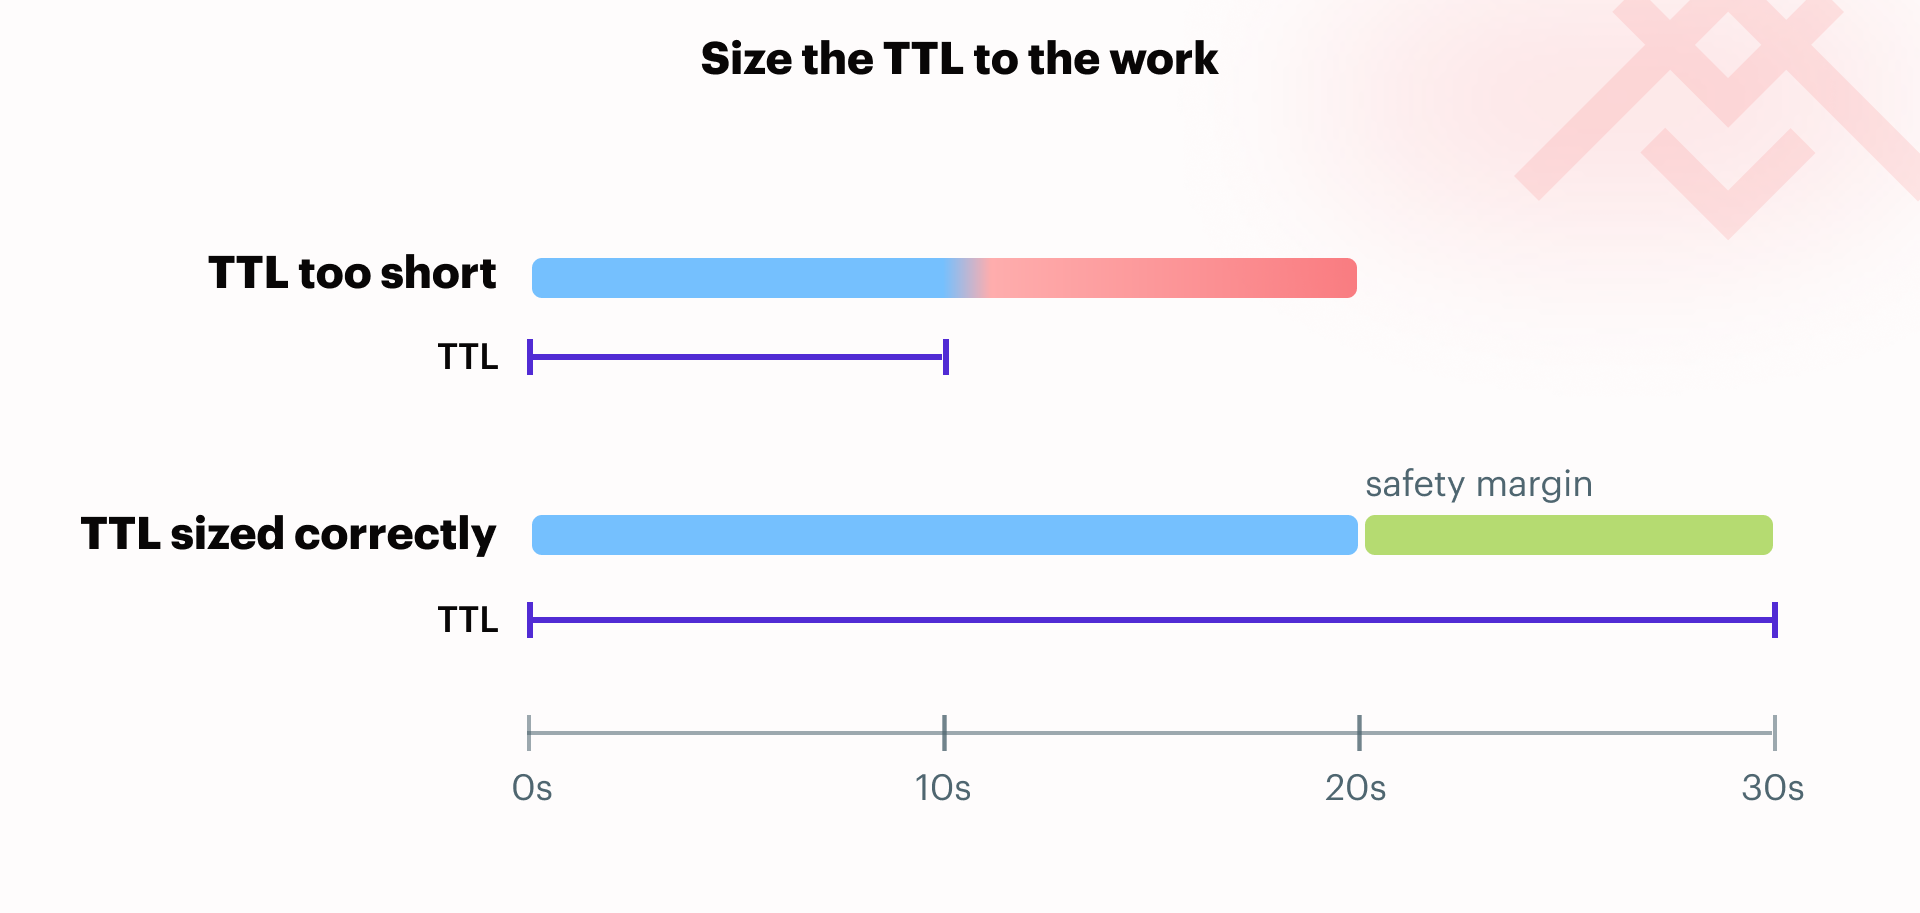
At the same time, the TTL should not be arbitrarily long. If an instance crashes while holding the lock, Redis will keep the key until the TTL expires. A very long TTL means other instances may be blocked for longer than necessary.
For short operations, a simple bounded retry loop is often enough. The following example tries to acquire the lock several times, waiting briefly between attempts.
const int maxAttempts = 5;

bool acquired = false;

for (int attempt = 1; attempt <= maxAttempts; attempt++)
{
    acquired = await db.LockTakeAsync(lockKey, lockToken, lockExpiry);

    if (acquired)
    {
        break;
    }

    await Task.Delay(TimeSpan.FromMilliseconds(100));
}

if (!acquired)
{
    Console.WriteLine("Could not acquire the lock after several attempts.");
    return;
}

try
{
    await ProcessJobAsync();
}
finally
{
    await db.LockReleaseAsync(lockKey, lockToken);
}

static async Task ProcessJobAsync()
{
    await Task.Delay(TimeSpan.FromSeconds(5));
}
The retry loop is deliberately bounded. If the lock cannot be acquired after a few attempts, the code stops trying and lets the application decide what to do next. That might mean skipping the current run, re-queuing a job, logging a warning, or trying again at the next scheduled interval.
A short delay, such as 100 milliseconds, is enough for many workloads. For high-concurrency systems, teams may add jitter or backoff. Jitter adds a small random variation so every waiting instance does not retry at exactly the same time. Backoff increases the delay after repeated failures, which reduces pressure on the lock key when many instances are competing for the same operation.
With or without jitter and backoff, the core principle is the same: retry briefly, avoid blocking indefinitely, and keep the lock TTL aligned with the protected operation.
Verifying the Lock TTL from the Command Line
We can inspect the remaining TTL for a lock key using memurai-cli.exe. This is useful during development when confirming that locks are being created with an expiration.
memurai-cli.exe TTL "lock:jobprocessor"
A positive number means the key exists and Redis is reporting the remaining time in seconds:
(integer) 24
If the command returns -2, the key does not currently exist, so the lock is not currently present in Redis. It does not indicate whether the lock expired, was released, or was never acquired.
(integer) -2
A -1 result means the key exists but has no expiration, which is not expected for this lock pattern because every lock should be created with a TTL.
During local testing, this simple check helps confirm that the lock key is temporary rather than permanent. A distributed lock should always have an expiration so another application instance is not blocked forever if the lock holder fails.
Limitations to Know
Redis locking is a practical coordination mechanism, but it is not a substitute for understanding failure modes and designing operations that are safe to retry. If Redis fails after a lock is acquired but before it is released, other application instances may have to wait for the TTL to expire. If the protected operation runs longer than the TTL, another instance may end up acquiring the lock while the first instance is still running.
The examples in this article use a single Redis-backed lock: one Redis key, one token, and one TTL for a protected operation. For many .NET workloads, a single Redis-backed lock is a reasonable trade-off: simple, fast, and easy to reason about when the protected work is short and bounded.
Redlock is an advanced Redis locking pattern for situations where a single Redis server is not enough for the lock’s reliability requirements. Instead of trusting one Redis node, the application tries to acquire the lock across multiple independent Redis nodes and treats the lock as acquired only when enough of them agree. It is separate from the single Redis-backed lock discussed so far, and it adds operational complexity.
Where Redlock changes how the application acquires a lock, high availability (HA) in Redis refers to a separate deployment concern. In Redis-compatible systems, HA usually entails deploying more than a single standalone server, using mechanisms such as replication, Sentinel, or clustering so the cache layer can recover from server failure.
Getting Started with Memurai
In this article, we learned how to acquire and release single Redis-backed locks in .NET using StackExchange.Redis and Memurai as a Redis-compatible native Windows Service. By using Memurai, we eliminate the need for additional layers such as Linux, containers, or WSL.
Memurai is free for development and testing, making it straightforward to continue learning about Redis locks and other concepts from this article on a local or staging machine. Memurai Developer has three restrictions that are important to be aware of before you scale up: a maximum uptime of 10 days before an automatic shutdown, a maximum of 10 unique connected IP addresses, and a RAM cap of 50% of available system memory.
If you're ready to move beyond Memurai Developer, register on the Memurai portal for a free 90-day Memurai Enterprise trial and run everything in this article without the listed restrictions.
Redis® is a registered trademark of Redis Ltd. Any rights therein are reserved to Redis Ltd. Any use by Memurai is for referential purposes only and does not indicate any sponsorship, endorsement, or affiliation between Redis and Memurai.